Overview
Payment methods refer to choice of payment options available to customer when placing an order. In most cases payment method relies on a third party system (payment gateway) to complete the financial transaction. Although financial operations are fairly standardised and well understood each payment gateway offers unique API to accomplish this. Therefore payment API in YC is composed of two parts:
- core payment API, which is fully integrated with YC order life cycle, dealing with standard approaches to transactions
- payment modules, which are payment gateway specific implementations that drive the standard operations.
YC has a number of payment modules implementation provided out of the box with flexibility to add new implementations with ease.
Once the platform up and running all payment modules are automatically detected and contribute to the payment gateways configuration in YC. Through system payment gateway panel business user can enable and disable payment gateways at the platform level. Shop managers when configuring shop instance can choose from the list of platform enabled payment gateways and configure them with shop specific parameters.
Payment gateway parameters are predefined by the payment module, so all that is necessary to enable payment methods for shop is to setup these values, which usually involves entering merchant keys or IDs.
The following payment gateway modules are supported out of the box (with few featured highlighted):
| Module | Payment method | YC version | EoL | Online | External | Callback | Per Shipment | AUTH | CAPTURE | AUTH_CAPTURE | RETURN |
|---|---|---|---|---|---|---|---|---|---|---|---|
| Core | |||||||||||
| Payment to courier | 3.0.0+ | offline | | | | | |||||
| Pre paid (external payments) | 3.0.0+ | offline | | | |||||||
| In store | 3.0.0+ | offline | | | | | |||||
| Test (card) | 3.0.0+ | online mock | | | | | | ||||
| TestExt (card) | 3.0.0+ | online mock | | base callback filter | | | | | | ||
| Invoice | 3.5.0+ | offline | | | |||||||
| Invoice with Authorisation | 3.5.0+ | offline | | | | | |||||
| No payment required | 3.7.0+ | online | | | |||||||
| Authorize.net | |||||||||||
| AIM | 3.0.0+ | online | | | | | | ||||
| SIM | 3.0.0+ | online | | AuthorizeNetSimPaymentOkPage | | ||||||
| CyberSource | |||||||||||
| CyberSource | 3.0.0+ | online | | | | | | ||||
| PayPal | |||||||||||
| PayPal Button | 3.1.0+ | online | | base callback filter | | ||||||
| PayFlow | 3.0.0+ | 3.0.0 | online | | | | | ||||
| PayPal Express | 3.0.0+ | online | | PayPay express callback filter | | | |||||
| PayPal NPV | 3.0.0+ | 3.0.0 | online | | | | | ||||
| PayPal Pro | 3.1.0+ | online | | | | | |||||
| LiqPay | |||||||||||
| LiqPay (full) | 3.0.0+ | online | | base callback filter | | ||||||
| LiqPay (no refund) | 3.0.0+ | online | | base callback filter | | ||||||
| PostFinance | |||||||||||
| PostFinance | 3.1.0+ | online | | base callback filter | |
Payment Gateway Management
Payment gateways list loaded into this panel is composed of automatically resolved payment gateways modules installed on current instance. The installation process is very simple and involves specifying few maven profile parameters during build.
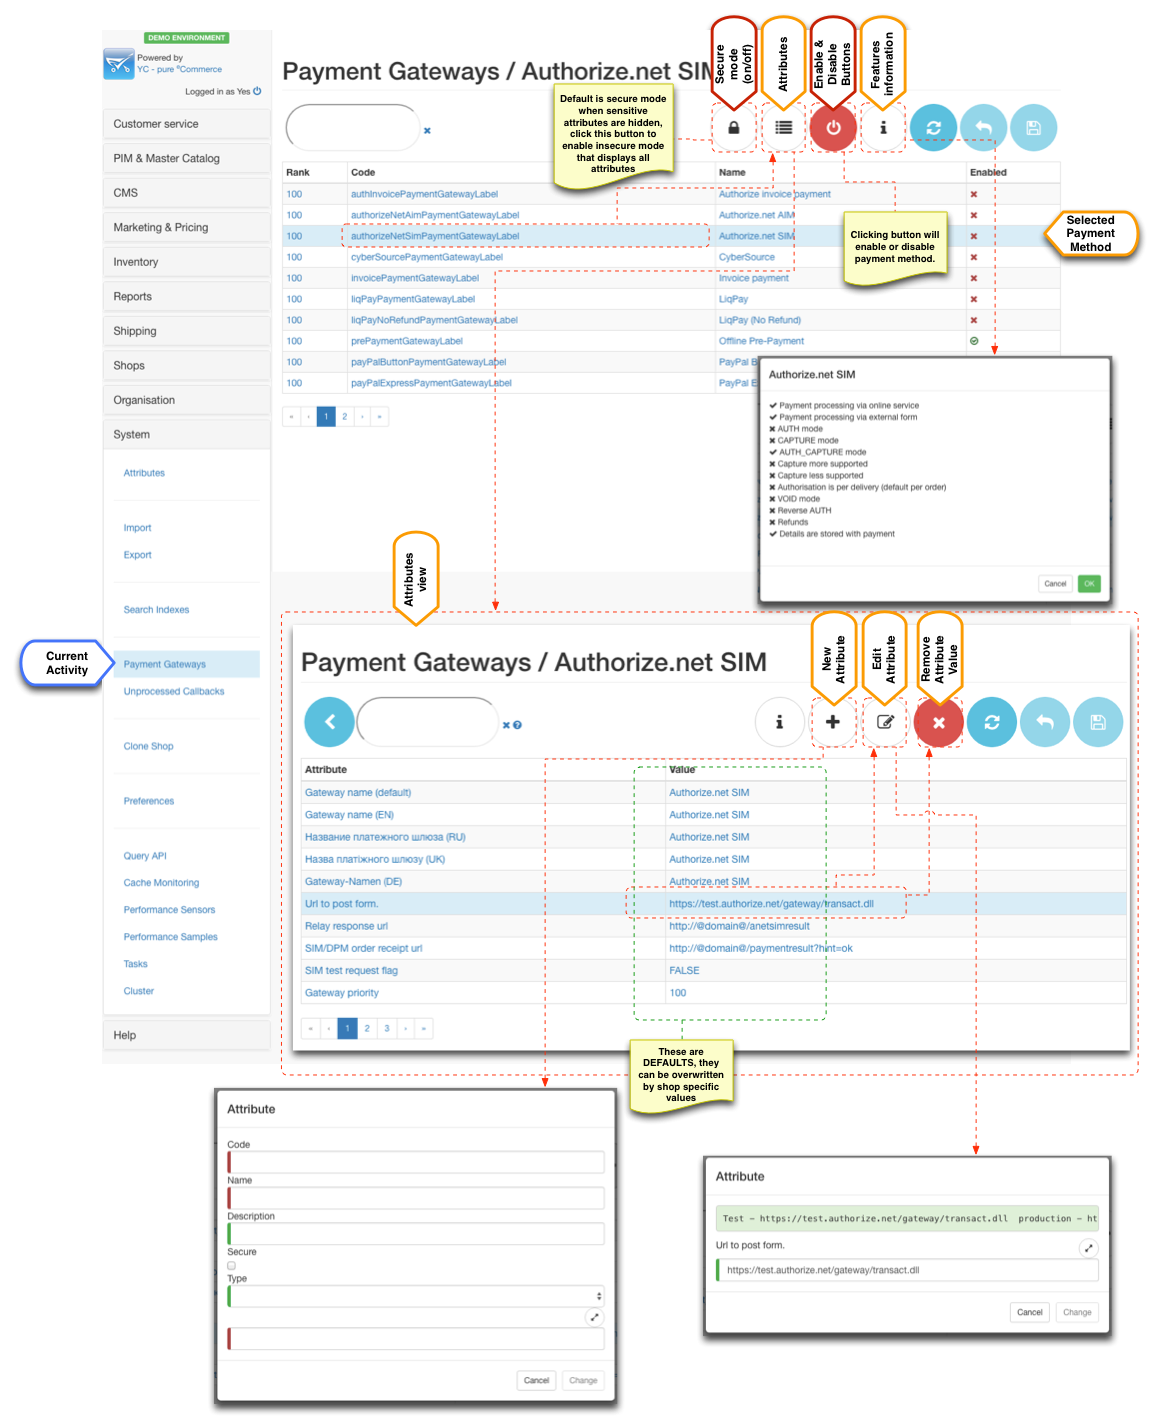
When this list is loaded system administrator can select which modules are enabled or disabled by clicking "on" and "off" buttons. If a payment gateway does not appear in this list then it is highly possible that this module was not added to the build, otherwise all payment gateways will appear in this list loaded from bundled modules.
Each payment gateway has predefined attributes, which can be viewed by clicking "Attributes" button when payment gateway is selected. Note that these parameters are templates - the actual values are set when configuring payment gateway for shop instance.
There is however an option to add additional attributes to template by clicking "New attribute" button. This allows to add new attributes such as new localisation for HTML form when new language is added.
As of 3.4.0+ this view uses "Secure" feature, which means that by default only non-secure parameters are loaded. If you want to see all parameters you have to click the "lock" button. Then you will see all attributes available for payment gateway in the attribute view.
Payment gateway eligibility
Payment gateways are directly influenced by shipping method configuration. The anticipation is that the kind of shipping method (i.e. carrier SLA) is the main driver for the payment eligibility.
For example if the shipping method is "collect from shop" it would make sense to display "Payment in shop" payment method, but not for say "Home delivery".
Carrier SLA configurations contain selection for payment gateways available to those SLA.
As of 3.6.0 and additional customer level restriction is available for payment gateways via "tagging" mechanism. Payment gateways have "restrictToCustomerTags" parameter which is a CSV of eligible customer tags. When filled in this parameter which contain use of given payment method only to customer that have at least one matching tag.
Payment gateway sorting
By default payment methods are sorted alphabetically by their language specific name. However if manual sorting is required then "priority" parameter can be used to sort them.
Note that if priorities of payment gateways are the same then sorting is done alphabetically. This is very useful when a particular payment method can be set higher priority to be at the top and then rest of the methods do not need to be adjusted and will be sorted in natural order.
Workshops
Payment Gateway Specific Configurations
Authorize.net
AIM
Key configurations for AIM
| Configuration | Mandatory | Notes |
|---|---|---|
| Merchant login | | API Login ID from your Authorize.NET account |
| Transaction key | | Transaction Key from your Authorize.NET account |
| Environment name | | test - "SANDBOX" production - "PRODUCTION" |
SIM
Key points for SIM
| Configuration | Mandatory | Notes |
|---|---|---|
| Merchant login | API Login ID from your Authorize.NET account | |
| Transaction key | Transaction Key from your Authorize.NET account | |
| MD5 Hash Key | MD5 Hash Key from your Authorize.NET account used to verify transaction callback | |
| URL to post form | test - "https://test.authorize.net/gateway/transact.dll" production - "https://secure.authorize.net/gateway/transact.dll" | |
| Relay Response URL | must be set to the "https://www.yourdomain.com/yes-shop/anetsimresult". Note: that this page must be served via HTTPS and it processes the transaction callback. Note: "/anetsimresult" is mounted to AuthorizeNetSimPaymentOkPage in "wicket.xml" | |
| SIM test request flag | test transaction - TRUE actual transaction - FALSE | |
| Payment form | There is a number of parameters that SIM supports to modify look and feel of the external payment form. Recommended "Order cancel URL" is "http://www.yourdomain.com/yes-shop/paymentresult?hint=cancel". |
CyberSource
Key configurations for AIM
| Configuration | Mandatory | Notes |
|---|---|---|
| Merchant id | Organization ID from your Cybersource Merchant Admin account account. Be careful with letter case | |
| Send to production | false - SANDBOX true - PRODUCTION | |
| Abstract path to directory with keys | Directory where p12 file will be placed on the server.
| |
| Enable log | Optional parameter to trace SOAP communication for payment. | |
| Absolute path to log directory | Path to log directory, when "Enable log" is set | |
| Cybersource API version | | Verified "1.28" |
| Use apache HHTP client for communication | | true by default |